Primary method for creating a �ready to weld� notched
tube
This procedure is the simplest and quickest method which requires only 1 cut to length (with zero waste)
before notches are cut. *joining tubes must be the same diameter
*
For this example we are using 1.5" tubing with a
wall thickness of .095
1)Mark a centered �X� on the 2 existing tubes where you want the
joints. Stretch out a tape rule and clamp in place (or a string will work) and measure the distance between those two �X�s. (see
illustration to visualize where to place the �X� � you do not actually lay tubing across the two)
2)Measure the acute (lesser) angle for each end. (this step is not necessary if both joints are perpendicular)
Remember to convert the measured angle to the notching angle by subtracting your measurement from 90. In this example angle A is 83� and B is 85� so the notching angle you would use for both notching and calculating would be 7� for A and 5� for B. If both joints are perpendicular enter "0" (90 - 90) for both angles A & B.
)
3)Calculate the overall length using the Easy Notch One Cut Calculator.
4)Cut a tube to
calculated length.
5)Notch either one of your recorded angles into one end of the tube.
6)
Notching the other end is dependant on whether or not the two tubes you are joining are in the same plane or not. The tubes in the example used here are in the same plane. So in this case, before removing the notched tube from the vise, mark top centerline using the snap collar locator and reference top centerline to the other end, flip the tube around and notch it in accordance to the correct angle and calculated setback.
6a)
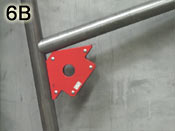
If the tubes are in a different plane (fig 6A) the next step would be to temporarily
secure the notched end of the tube to its final position
(fig 6B).
and then lay the unnotched
end across the joining tube (fig 6C), centered on the �X�,and
temporarily secure it. Snap on the correct diameter collar and slide it into position where the two tubes intersect on the acute angle side. While maintaining that intersected position, rotate the collar so it faces the acute angle side (fig 6D). The Centerline Finder tool (not shown) can help at this point to accurately position the collar at top centerline.
(The more precise you are at marking the correct location
at this point will determine how accurate your notch will
be.) Now you're ready to make the final notch according
to your reference marks
7) Dress the notch if necessary for better fitment. You should be
ready to weld now.
If you are use to working with fractions, click here
to view a
conversion chart!